
| 일 | 월 | 화 | 수 | 목 | 금 | 토 |
|---|---|---|---|---|---|---|
| 1 | ||||||
| 2 | 3 | 4 | 5 | 6 | 7 | 8 |
| 9 | 10 | 11 | 12 | 13 | 14 | 15 |
| 16 | 17 | 18 | 19 | 20 | 21 | 22 |
| 23 | 24 | 25 | 26 | 27 | 28 |
- alias
- 이클립스
- Java
- group by
- HTML
- SQL
- oracle
- JSP
- Bootstrap
- 모조칼럼
- 부트스트랩
- jQuery
- 성적프로그램
- 한글 인코딩
- 답변형 게시판
- Oracle SQL
- 과정평가형
- HTTP Status 404
- rownum
- git
- sql developer
- github
- 제약조건
- tomcat
- ||
- distinct
- CRUD
- JavaScript
- HTTP Status 500
- Oracle DB
초급의 끄적거림
[jQuery] for, each, this 연습 / 요소의 탐색과 생성 / 시계만들기 / 날짜 자동생성 본문
1. 10. for_each.html
10-1)
1) 메인 화면
2) 한번 '7단!' 을 클릭했을 경우, 구구단 7단이 한 번 발생
3) '7단!'을 두 번 클릭한 경우, 클릭하는 횟수마다 구구단이 생김
<!DOCTYPE html>
<html lang="ko">
<head>
<meta charset="UTF-8">
<title>javascript의 for문과 jquery등의 each</title>
<link rel="stylesheet" href="http://fonts.googleapis.com/earlyaccess/notosanskr.css"/>
<style>

    body,button {
        font:20px "Noto Sans KR",sans-serif;
    }

    #displayList {
        margin:20px;
        width:400px;
        height:300px;
        background:#81D4FA;
        padding:20px;
        list-style: none;
    }

</style>
</head>
<body>
<button id="startBtn">7단!</button>
<ul id="displayList"></ul>

<script src="js/jquery.js"></script>
<script>
	//10-1) each 반복문
    $("#startBtn").click(function(){
      var dan=7;
      for(i=1; i<=9; i++){
      	$("<li>").text(dan+"*"+i+"="+(dan*i)).appendTo("#displayList");
        //appendTo를 사용 했기 때문에 덮어쓰지 않고 연결해서 뒤로 붙게 됨 (댓글 원리)
      }//for end

      //10-2)
      $("li").each(function(){
      	var result=$(this).text();
        alert(result);
      }); //each() end, 본문에서 li 요소를 찾는다
    }); //click() end


</script>
</body>
</html>

10-2)
①,② 구구단 7단이 alert로 뜨는 모습
③ 마지막 7*9가 뜨고나면 1~9까지 한번에 다 나타남

2. 11_this연습
1) CSS 를 추가하여 각 버튼 별로 색상만들기
<!DOCTYPE html >
<html lang="ko">
<head>
<meta charset="utf-8"/>
<title>복습</title>
<link rel="stylesheet" href="http://fonts.googleapis.com/earlyaccess/notosanskr.css"/>
<style>
	.btn {
		border:none;
		color:#fff;
		width:120px;
		height:50px;
		cursor: pointer;
		font:100 24px 'Noto Sans KR',sans-serif;
	}
	.btn:hover {
		font-weight: 900;
		box-shadow: 0 12px 15px 0 rgba(0, 0, 0, 0.24), 0 17px 50px 0 rgba(0, 0, 0, 0.19);
	}

	dl {
		width:300px;
		height:200px;
		border:1px solid #616161;
		padding:10px;
		margin: auto;
	}
	dt,dd {
		margin:7px;
		font-size:18px;
		text-align: left;
		color:#616161;
	}
	dt {
		font-weight: 900;
		font-size:22px;
		text-align: center;
	}
	#color {
		display: inline-block;
		width:50px;
		height:30px;
		background:#999;
		text-align: center;
	}

	#exBox {
		width:400px;
		height:300px;
		box-shadow: 0 12px 15px 0 rgba(0, 0, 0, 0.24), 0 17px 50px 0 rgba(0, 0, 0, 0.19);
		text-align: center;
		padding:20px;
		background: #fff;
		position: fixed;
		left:50%;
		top:50%;
		margin:-170px 0 0 -220px;
	}

</style>
</head>
<body>
<button id="openBtn" class="btn">버튼</button>
<div id="exBox">
	<p>
		<button id="pinkBtn" class="btn">멋진 핑크</button>
		<button id="blueBtn" class="btn">쿨한 파랑</button>
		<button id="greenBtn" class="btn">네온 녹색</button>
	</p>
	<dl>
		<dt>클릭한 버튼정보</dt>
		<dd>클릭한 버튼의 index : <span id="index">?</span></dd>
		<dd>클릭한 버튼의 뒷배경색 : <span id="color">?</span></dd>
		<dd>클릭한 버튼의 글자 : <span id="text">?</span></dd>
	</dl>
</div><!--//exBtn -->
<script src="js/jquery.js"></script>
<script>
	$("#exBox.btn").click(function(){
    	var idx=$(this).index();
        $("#index").text(idx);

        var color=$(this).css("background-color");
        $("#color").text(color);

        var txt=$(this).text();
        $("#text").text(txt);
    }); //click() end (id가 exBox인 곳의 .btn 클래스)

</script>
</body>
</html>
3. 12_요소의 탐색
<!DOCTYPE html>
<html lang="ko">
<head>
<meta charset="utf-8">
<title>요소의 탐색</title>
<style type="text/css">
    table {
        border-collapse:collapse;
        font:bold 50px Arial, Helvetica, sans-serif;
        margin: auto;
    }

    table td {
        padding:20px 35px;
    }
</style>
</head>
<body>
<table border="1">
    <tbody>
    <tr>
        <td>1</td>
        <td>2</td>
        <td>3</td>
    </tr>
    <tr>
        <td>4</td>
        <td>5</td>
        <td>6</td>
    </tr>
    <tr>
        <td>7</td>
        <td>8</td>
        <td>9</td>
    </tr>
    </tbody>
</table>
<script src="js/jquery.js"></script>
<script>
	//DOM구조에서 원하는 요소까지 이동하고 찾아가는것
    $("td").eq(2)
    	   .css("background", "red")
           .prev()
           .css("background", "yellow")	//prev를 써서 그것보다 앞에 있는 것에 영향
           .parent()			//첫 번째 tr ( 1 2 3 이 parent)
           .next			//두 번째 tr
           .children()			//두 번째 tr에 있는 자손인 td 4, 5, 6
           .eq(1)			//<td>5</td>
           .css("background", "blue");

</script>
</body>
</html>

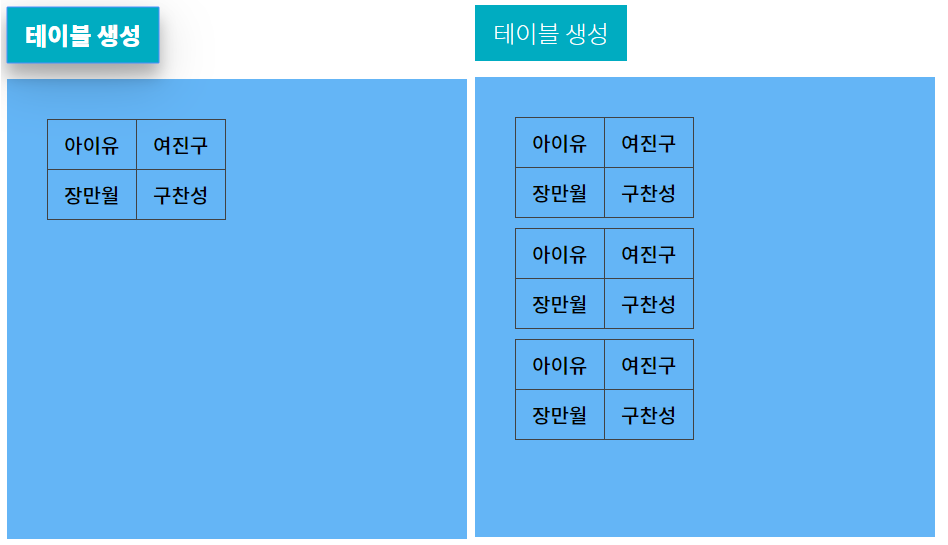
4. 13_요소의 생성 ★★★
⊙ 요소를 생성하는 이유 : 댓글의 더보기 등의 무한 스크롤링하기 위해
⊙ append(), appendTo() 요소를 끝에 추가
⊙ prepend(), prependTo() 요소를 앞에 추가
⊙ 부모.append(자식)
⊙ 자식.appendTo(부모)
<!DOCTYPE html>
<html lang="ko">
<head>
<meta charset="UTF-8" />
<title>요소의 생성</title>
<link rel="stylesheet" href="http://fonts.googleapis.com/earlyaccess/notosanskr.css"/>
<style>
    button {
        border:none;
        color:#fff;
        padding:10px 18px;
        cursor: pointer;
        font:100 24px 'Noto Sans KR',sans-serif;
        background:#00ACC1;
    }
    button:hover {
        font-weight: 900;
        box-shadow: 0 12px 15px 0 rgba(0, 0, 0, 0.24), 0 17px 50px 0 rgba(0, 0, 0, 0.19);
    }
    #box {
        width:400px;
        min-height:400px;
        padding:30px;
        background:#64B5F6;
        font:500 20px "Noto Sans KR",sans-serif;
    }

    table {
        border-collapse: collapse;
        margin: 10px;
    }

    td {
        border:1px solid #424242;
        padding:10px 16px;
    }

</style>
</head>
<body>
	<p>
		<button id="createBtn">테이블 생성</button>
	</p>
	<div id="box"></div>

<script src="js/jquery.js"></script>
<script>
	$("#createBtn").click(function(){
    		 //1) 문법을 직관적으로 보기에는 편하지만 헷갈리고 많아지면 유지보수가 어려울 수 있기 때문에 추천하지는 않음
		var table="";
		table+="<table border='1'>";
		table+="<tr>";
		table+="	  <td>호텔 델루나</td>";
		table+="</tr>";
		table+="</table>";
		//$("#box").text(table);  //순수 문자열
		$("#box").html(table);   //마크업

      		//2)
         	var $table=$("<table></table>"); //문법을 직관적으로 알아보기 어렵
		var $tr1   =$("<tr><td>장만월</td><td>구찬성</td></tr>");
		var $tr2   =$("<tr>");  // </tr>이 없지만 요소 생성시 알아서 들어감
		var $td3   =$("<td>아이유</td>");
		var $td4   =$("<td>").text("여진구");

   		   //$tr2에 $td3, $td4를 마지막에 자식으로 추가
		$tr2.append($td3, $td4);

		//$table에 자식으로 추가
		$table.prepend($tr2, $tr1);

		//append를 사용했기 때문에 여러 번 누르면 그 횟수만큼 찍힘
		$("#box").append($table);

    });
</script>
</body>
</html>
1)

2) append 를 했기 때문에 여러 번 누르면 여러 번 연결 되어 찍힘
5. moment.js
- moment 는 날짜 같은 것을 지원하기 위한 오픈소스 (https://momentjs.com/)
Moment.js | Home
Format Dates moment().format('MMMM Do YYYY, h:mm:ss a'); moment().format('dddd'); moment().format("MMM Do YY"); moment().format('YYYY [escaped] YYYY'); moment().format(); Relative Time moment("20111031", "YYYYMMDD").fromNow(); moment("20120620", "YYYYMMDD"
momentjs.com
⊙ 날짜데이터를 년월일로 읽음
but 외국은 월일년인 경우가 많아서 한국말관련 된 것은 moment-with-locales.js가 맞음
⊙ moment.js를 쓰려면 반드시 jquery.js가 있어야 사용 가능
- jquery 폴더의 'blank.html'을 복사하여 '14_moment.html'
<!DOCTYPE html>
<html lang="ko">
<head>
<meta charset="utf-8">
<title>14_moment.html</title>
</head>
<body>
	<h1 id="time"></h1>
	<!-- 자바스크립트 기반 오픈소스 (외부라이브러리) -->
	<!-- jquery.js / moment.js / bootstrap.js / angular.js / node.js 등등 자바스크립트 기반 오픈소스는 다양함 -->

<script src="js/jquery.js"></script>
<script src="js/moment-with-locales.js"></script>
<script>
    //1) JavaScript
    var now    = new Date();
    var year   = now.getFullYear();
    var month  = now.getMonth()+1;
    var date   = now.getDate();
    var hour   = now.getHours();
    var min    = now.getMinutes();
    var sec    = now.getSeconds();

    var fullDate="";
    fullDate+=year +"년"+month+"월"+date+"일";
    fullDate+=hour+"시"+min+"분"+sec+"초";
    $("#time").text(fullDate);

    //2) moment.js 오픈소스 기반
    var now=moment; //moment.js라이브러리 시작
    moment.locale("ko") //한글 날짜 형식으로 지정
    var fullDate=now.format("YYYY년 MM월 DD일 hh시 mm분 ss초");
    $("#time").text(fullDate);

</script>
</body>
</html>
5-1) javaScript

5-2) moment.js


6. 15_아날로그시계.html
<!doctype html>
<html lang="ko">
<head>
<meta charset="UTF-8">
<title>아날로그 시계</title>
<link rel="stylesheet" href="css/reset.css" />
<link rel="stylesheet" href="css/font-awesome.min.css" />
<style>
    #wrap {
        width:600px;
        height:600px;
        position: fixed;

        left:50%;
        top:50%;
        margin:-300px 0 0 -300px;
        font-family: bon,sans-serif;
    }
    #wrap h1 {
        height:80px;
        font-size:50px;
        text-align: center;
        line-height: 80px;
        font-weight: 700;
        color:#424242;
    }
    #clock {
        width:500px;
        height:500px;
        background:url(img/Clock-face.png);
        background-size:100% 100%;
        margin: auto;
        position: relative;
        box-shadow: 0 12px 15px 0 rgba(0, 0, 0, 0.24), 0 17px 50px 0 rgba(0, 0, 0, 0.19);
    }

    /* 1) CSS추가 : 시분초 이미지가 출력되는 위치 지정 */
    .hand{ /* div 태그에 있는 class가 hand에 해당 */
    	width: 500px; height: 500px; position: absolute; left: 0; top: 0;
    }

    /* 2) CSS추가 : 시분초이미지 출력 */
    #hour {background: url("img/hour_hand.png");}
    #min {background: url("img/minute_hand.png");}
    #sec {background: url("img/second_hand.png");}

</style>
</head>
<body>
    <div id="wrap">
        <h1><i class="fa fa-clock-o"></i> 시계</h1>
        <div id="clock">
            <div id="hour" class="hand"></div>
            <div id="min"  class="hand"></div>
            <div id="sec"  class="hand"></div>
        </div>
    </div>

<script src="js/jquery.js"></script>
<script src="js/moment-with-locales.js"></script>
<script>
	//최초 함수 호출
    showTime();

    function showTime(){
    	var now	=moment();
        var hour=now.hour();
        var min =now.minute();
        var sec =now.second();

    	//3) 초, 분, 시침 이미지 각도 꺾기 (한 바퀴 360도를 60번)
    	$("#sec").css("transform", "rotate("+(6*sec)+ "deg)");
    	$("#min").css("transform", "rotate("+(6*min)+ "deg)");
    	$("#hour").css("transform", "rotate("+(30*hour+0.5*min)+ "deg)");
    }//showTime() end

        //4) 1초마다 주기적으로 함수를 호출하는 것
        setInterval(showTime, 1000);
</script>
</body>
</html>
7. 16_날짜자동생성.html
<!DOCTYPE html>
<html lang="ko">
<head>
<meta charset="utf-8">
<title>16_날짜자동생성.html</title>
</head>
<body>
	<select id="year"></select>년
	<select id="month"></select>월
	<select id="date"></select>일
<script src="js/jquery.js"></script>
<script src="js/moment-with-locales.js"></script>
<script>
	//날짜 데이터 자동 생성

    //최초로 함수 한 번만 호출
    createYearMonth();
    function createYearMonth(){
    	//1) 1월 ~ 12월 생성 후 추가
        for(m=1; m<=12; m++){
         	$("<option>").text(m).appendTo("#month");
        }//for end

        //2) 올해 (2019)을 기준으로 -5년, +5년씩
        var nowYear=moment().year();
        for(y-nowYear-5; y<=nowYear+5; y++){
        	//3) 현재 연도를 미리 selected
            if(y==nowYear){
        	/* 방법1)
            $("<option>").text(y)
            			 .attr("selected", "selected")
                         .appendTo("#year");
            */
            $("<option>").text(y)
            			 .prop("selected", true)
                         .appendTo("#year");
       	 	}else{
        		$("<option>").text(y).appendTo("#year");
        	}//if end
          }//for end

          //4) '일' 생성하는 함수 호출
          createDate();
    }//createYearMonth () end

     function create Date(){
     	//text() : 일반적인 요소의 문자열값을 얻어올 때
        //val()  : <input> <select> <textarea> 등의 폼과 관련된 값(컨트롤요소) 얻어올 때

        //5) 기존 '일' 출력된 값 지우기 (2월이면 기존의 1월의 값을 지워주고 다시 찍어야하기 때문에 리셋시키는 것으로 볼 수 있음)
		//empty를 해주지 않으면 1월의 31일까지 나타나고 후에 누른 4월의 30일까지 나타나게 됨, 계속 쌓임
		$("#date").empty();

        //6) 목록에서 사용자가 선택한 연도를 얻어옴
        var year=$("#year").val();

        //7) 목록에서 사용자가 선택한 월을 얻어옴
        var month=$("#month").val();

        //8) endOf() : moment.js에서 해당 월의 마지막 일을 얻어옴
        var endDay=moment(year+"-"+month).endOf("month").date();

        //9) '일' 추가
        for(d=1; d<=endDay; d++){
        	$("<option>").text(d).appendTo("#date");
        }//for end
     }//createDate() end

     //10) 사용자가 년, 월을 변경 했을 때 (이벤트 발생)
     //	   '일'을 바꾸는 함수를 호출
     $("#year, #month").change(createDate)

</script>
</body>
</html>

'jQuery' 카테고리의 다른 글
| [jQuery] table의 td / ul의 li 값 가져오기 (0) | 2021.09.06 |
|---|---|
| [jQuery] $(function(){ }); 부분이 실행 안될 때 Uncaught ReferenceError: $ is not defined (0) | 2019.10.29 |
| [jQuery] jQuery의 정의 /선택자, css, 속성 메소드, this, index 등 연습 (0) | 2019.08.30 |
| [jQuery] jQuery 관련 이클립스 플러그인 tern 환경설정 (0) | 2019.08.30 |


